Hi, I'm starting to collect, design and gather some 3D parts for the flysky i6 transmitter. I will add them here with links as I get through them, please let me know if you happen across some cool things also. Here I made a replacement cover for the battery compartment
The link is here Also I made a Lithium battery holder so I can use rechargable batteries I have. The design is specific to the battery but you can use it as a guide for your own
So, now that I have my ebike built and setup I guess I should test ride it and show some stats. What better way to do this than with the ultra competitive online bullshit competition site Strava!
I can already feel the blast wave from your shock and gasps. Yes, I'm a massive cheat, etc etc. But this is a little bit of tongue in cheek humour and also a test of my ebike. What better way than to run it against the hardcore cyclists, who themselves run hidden motors on their bikes to cheat in competition? Who dope using epo just like the pros. That's right just like the pros themselves. And with that notion, I am doing nothing different than them... So sit back in your chair, unclench whatever part of lycra you are clenching and read my results. This is my ebike by the way
It's not exactly a Pinarello Dogma
But this is what you increasingly see the Strava crowd riding on, waxing their bodies, trying to be as close to the marketing machine of professional cycling as they can possibly be.
The question is can this ghetto ebike keep up? Can it exceed? Or does it fizzle out? For my test I did a night ride loop, just totalling 9.7 miles as seen above. I barely pedalled, I could probably eat a donut or smoke a cigarette while did this ride. Physically, I felt no different when I finished, than when I set off. Except my ass hurt from lack of suspension. I may have to look into that. My maximum speed was 32.4mph. However I have ridden the ebike faster than this and got 35mph
So what kind of results do I get? Well I got the KOM (King of Mountains) trophy, by a country mile. These Strava riders clearly struggle with the uphills.
As you can see from the results I covered the 'mountain' (It's hardly a mountain, but a hill, reasonably challenging) and bumped every other rider by several minutes
Those carbon fiber clad losers need to pay more for the latest Pinarello model, clearly. How else can you win but by spending thousands of dollars on a bicycle and shaving your legs? Interestingly, on the flats, and downhills, I am only just getting inside the top 10. I think a combination of my ghetto bike with pannier bag holding my sandwiches, creating wind drag, the limits of the motor, my wheel size, not shaving my legs, all these things are holding me back from the number #1 spot. Oh, and probably pedalling. Pedalling would probably help, but why bother? When riding the ebike, the air roaring past your ears at speed, makes hearing more difficult, I wear a warm hat to fix this issue, it also keeps my ears warm and prevents ear ache. Also lack of pedalling/exertion means that you feel the cold much more, just like riding a motorbike does. Remember, I am here in the damp and cold of England. Riding the ebike at night is like standing naked in front of an air conditioner. (See Update on temperature handling) Riding the ebike motor like this does make the motor unit heat up. It gets warm just like the motors on my quadcopter brushless motors. If there wasn't the cold air of England to provide cooling, If I happened to say, be in California, or worse, Nevada, then I am sure over heating the motors would be an issue at the speed I rode this ride. But, it seems to cope well here.
Things I notice about the ebike
Hmmm, One of the things that is noticeable is the throttle slider. It is either on, or off. I assumed that it would be more like a real throttle control where you can apply power as you increase or decrease the press of the slider. Another thing, is that I can exceed the rated wattage, according to the ebike display, I find myself hitting 1000 watts sometimes. And I am not too worried about the motor. I can 'feel' how it is performing as I ride. Or, at least I think I can... Also, I am unable to use the one lowest gear on my bike. If I switch to this 'granny' ring, the chain falls off. I could buy a special chanring to fix this issue, but I don't want to pay $200 just to allow me to use this single gear. I am in the process of designing a chain catcher to see if I can solve this issue for zero cost
Conclusions
Yes I know, I am a cheating sonofabitch. But try to see the lighter side of this. Right here, is the future of cycling. I mean that. This ebike system is going to take over our everyday lives. It has speed, it has range, I have 1 hour charging. These three things make a very very viable mode of transport. It's going to enable the poor, it's going to enable the less able. Commuting to work will be in your own hands, and no longer at the mercy of public transport delays. I estimate I can ride 60-80 miles on this ebike, and I will indeed perform a test to show this can happen. This ebike shows that you can choose to pedal if you wish to, or you can just cruise like you do in your car. The cost savings which include not having to pay out for mandatory insurance, mandatory annual MOT test, mandatory road taxation fees, and zero gasoline costs, makes this an extremely viable commuting option and is putting the cost savings back into the people's wallets and that is a good thing for everyone. One of the issues of motor car driving here in the UK are the annual costs as stated (insurance, mot, tax, fuel), collectively it is expensive, and prohibitive for the poor; we are talking paying the equivalent of the cost of a new car, every year just to be allowed to drive your car. If you can't pay, you go to jail. I like the ebike. It puts power and mobility into the hands of everybody, not just the privileged. You could of course just use a push bike, but the ebike enables those less able to. If the government outlaws the ebike, which I don't think it can do, there should be outrage and protest; It would signal to me that they desperately want to control a system of taxation, without considering the needs and upward mobility of the poor. I for one will be fighting for the ebike forever. Now, just how do we stop the rain?...
Sorry to the Strava crowd for my test. I will be removing it from record soon. I must also emphasise that I do sometimes use strava legitimately on my pedal bike, and also have a few KOMs and number 1 positions. One of these pics I'm at the top of Mont Ventoux, and I didn't have to run.
Update #1: Ambient temperature & Motor heat
As I learned on my early test rides, riding the ebike in the UK is generally cool for the motor; It does not heat up and is not affected as much by ambient temperatures below 18 degrees Celsius/64 Fahrenheit. However, this week saw unusual UK temperatures due to a heat wave pushing us into 35 degrees Celsius/ 95 Fahrenheit. On my normal ebike grocery journey, one which the motor handles hills just fine in normal UK weather, keeping nice and cool and not overheating the motor, this week I noticed that indeed my motor was becoming much hotter. I did not have a thermometer available, however I predict that my motor was hot to the touch and an estimate of over 65 degrees Celsius. I predict that the heat was generated from pulling me up some road hills (2-3 hills of 300m @ 9% incline) on my journey. I also had some groceries in a bag, but no different than the same journey in cooler weather.
I can understand other people's reviews of the ebike motor and concerns about heat management based on the reviewers location. It is likely that the reviewer is testing in a hotter environment than me. However, I would recommend research into cooling systems for ebike motors to help with this, after all, electric cars have cooling as do home computers. Selecting a lighter gear ratio for your ebike would also probably help generate less heat in a hotter environment.
Anyway, just observations and writing. Here's my idea for a cooling system
I would like to show how I am charging my ebike battery packs. In the Electric Vehicle (EV) world, developments in battery charging means that we can now recharge vehicle batteries in a short amount of time.
With charging systems such as on a Tesla car with huge batteries which weigh a whopping 544KG, for the Tesla to achieve a rapid recharge in around 80minutes it needs to also use a massive charger like the 'Tesla Supercharger' station seen above. Big batteries need Big chargers, and this is exponentially matched if you wish to recharge within this short time frame. The same is true for ebikes. If you wish to recharge in a short time frame, you need a decent charging station, albeit modest when compared to the Tesla Supercharger. At the moment, there are limited options for an ebike owner to buy a packaged system from a retail company, and the price is also suitably matched (high priced) from these companies. If you google ebike charging station you get a whole host of Utopian-idealist dreams. As we stated above, the Tesla battery weighs 544kg, my ebike battery weighs 3.8kg. This is where a spot of DIY can save you lots and lots of money. In the Hobby Remote Control world it is well known that people make their own systems for quite small amount of cost. A popular solution is to use PC computer power supplies and connect them to a charging controller to supply the battery with a particular pattern of charging depending on its capacity and chemical composition. What this means to you and I, is that we can use this same system (with a little know-how) and have our very own ebike/Tesla Supercharger in our own home. Here is my ghetto setup
I am using two cheap (but powerful) 12 volt power supplies taken from a computer, they have been wired in series to make 24 volts. Then, they run to a charging system which can be set to match your battery, in my instance; two 24 volt Lithium batteries with a capacity of 16ah. Together they make a 48 volt battery to run the ebike motor.
A little bit of test observation for the Turnigy Reaktor 300W charger, charging the 16000mah 6s batteries, the charger is capable of charging at just under 13 amps. A more powerful charger and we could charge the batteries at the 1C rating of 16 Amps, but that of course would cost much more money for such a charger. For example, the icharger 3010B puts out 30amps/1000Watts (£160), Turnigy Reaktor 30amp/1000Watt (£100). More on the Junsi range here.
For my budget, I am okay with just-shy-of 13Amps charging. Maybe I will test other chargers in future. Charging the ebike batteries takes my charger approximately 30-45minutes each depending on how depleted they are. 1hr 15mins from 'flat' (3.2v per cell).
My Power Supply unit could easily power two chargers at the same time. Probably four or more at the same time.
(China charging station)
What this means to you and me is that I can recharge my batteries just like the Tesla supercharger, and in around 1 hour I have a fully charged battery ready to ride again. This is how the DIY charging station is going down in Shenzen China. Retail systems made by companies seem to be pricing around £2000 just for recharging systems. If you want off-the-shelf stuff you will pay about £500-600 for a 1-hour charging station. DIY is much much lower cost, but you have to know what you are doing, and most of us don't.
Of course we can also recharge slowly using cheap chargers, which will be suitable for 12-hour overnight charging, and these can be had for modest amounts. But if you wish to be a DIYer you can have a 1-hour supercharger for just a little bit more.
I wired up a battery harness to connect two 24 volt batteries together, creating a 48 volt battery. Here is what I used:
2 x Male XT90 connectors
1 x Female XT90 connector
10AWG wire in Black & Red
Some pieces of 6mm Heat shrink tubing
Wiring it together is straight forward, you have to take note of the correct soldering as seen here
I recommend considering the use of anti-spark connectors for the motor connection. They can be bought here cheaply.
Powering up the ebike is a nice result after all that planning. It works! The colour display has nice information, not just clock and speed, but also displays Watts so you can see if you're pushing the 750Watt motor too hard (The motor will heat up). I have 9 power assist levels, and find anything past level 5 to be a thrill ride. The throttle control also lets me cruise without pedalling. I overtook a lady on a steep hill yesterday, she was gasping for breath at 3mph and I roared past at 25mph glancing back at her 'I hate you' smile. People gaze at me as I ride past - I notice that they are staring at the lipo packs mounted on the frame trying to figure it out. I may have to cover them and make them less obvious.
One thing I wish I had was manual adjustment of the pedal assist maximum speed limit. I can set it to one of three settings 15kph, 25kph, or 45kph however, I think I would like to set this manually to suit me, as I find my natural bicycle riding pace to be about 18-20mph and I find 25kph/15mph a bit disheartening when I have to pedal normally without power assist once I have passed this speed. I'm sure there will be commenters saying that 15mph is the law, but I'm cycling naturally at 18-20mph, I always have done. I'm quite a cyclist with years of riding. I once rode over 3500km from my home in Manchester to Naples in Italy camping every night at the side of roads and in fields. I have several bike tour experiences.
*Update: it does indeed let me adjust manually the assist mph/kph in single digits. All is good.
I am waiting for a power supply for my lipo chargers to arrive then I will probably do a full test of range and the display performance. All in all I am happy with the motor performance. I would like the chainring issue to be solved - I will 3D print a chain roller guide this weekend, and the Pedal assist limit to be changed. Those are my only gripes so far.
Hi, I finally got round to designing and printing off all the mount parts I needed to allow me to mount the big batteries. Here are some pictures
It was actually more time consuming than I realised to design and print. Each mount took approximately ten hours each to print so I just set it to run and run while I went out to get bolts and screws. I'm really happy with the way it came out, the measurements were pretty much spot on for the tubing, and the bolt holes worked - I used hexagon holes at the back to help tighten the nuts without having to use a tool to tighten there. The batteries will be held over the top with straps, and there are some foam pieces for support of the batteries. They are held really tightly. I ended up using PLA as a print material and I am happy with how strong it is. Fitting the Bafang motor set was fairly straight forward, I had no difficulty, I had all the tools needed. There is a nice guide to fitting the motor here:
I do recommend getting a 'Hollowtech II' spanner to help you to tighten the lockring for the motor. The only issue I had was that I cracked the plastic bottom bracket cup when removing the old unit but it was easy to saw through and remove once I had the thing removed by unscrewing the other side. I recommend looking up a video on youtube to help figure that process out. I think, all that is remaining for me to do is solder a Y-harness to connect the batteries to the motor (in series 2 x 24volt batteries = 48v) which I will do after a cup of tea.
One issue I face from the setup is the notorious 'chain falling off' problem. I took the bike for a test pedal to check the brakes and gears, and of course the chain falls off the motor ring when trying to use the top two gears at the back. I didn't know about this before searching on the internet. There are discussions herehere and here. It seems that the BBS02 Motor has been designed with Hub gear units in mind, and not in general traditional multi-cog cassettes. Hub gears mean that the chain will not move up of down when shifting gear, it will always be in one position. By attempting to use standard cassette gear systems, the BBS02 has a flaw where the chain will fall off, usually on the upper two gears due to chain alignment issues. There seem to be people who have already experimented with solutions, and these range from a complete front chainring replacement (around £100), using a hub gear as mentioned (Anywhere from £300 to £1500), and also using a chain catcher device (£3 - £30). I will probably begin with fashioning a chain catcher first and seeing how that goes. It's a bit of a shame that Bafang does not function smoothly out of the box, the company should explain this in their advertising or better yet fix their standard rings with a few more millimeters offset. Grrrr. When I ordered my motor kit, I chose a 46T chainring to be shipped with it, and right now, after my first test, I think it is too hard for both my gear range and local geography. I live in a somewhat hilly area (which is used for UK Tour De France races) so it can be considered not at all flat like the city. I think I would recommend a 36T chainring for my hilly roads, possibly even fewer teeth, but I will test and learn. The 46T is in my eyes even too hard for a cold start on flat (using my rear gear ratio). Ah things we learn! - Was not true in real testing. It actually works quite well on the road and is nice and powerful with good pull. So Things left to do are Wire harness making, and cheap chainring solutions. I wonder if PETG will be strong enough for a 104mm BCD adapter? Crazy suicide idea? Or cheap genius?
Hello, the motor unit arrived today, I thought I would take a few photos of what arrived in the box.
The packaging box is approximately the size of which it could hold an inflated football (soccer ball).
The motor unit itself weighs quite considerably, I guess it is in the region of 5kg without crank arms or chainring attached. Better hope your bike frame is strong, with all this weight on it. The motor does feel like a quality item, the weight alone tells me this thing has the potential to exceed my expectations on producing some Watt power. I was expecting some measly half-joke of a motor, but I feel genuinely surprised.
There is also a bag containing screw and mounting parts for the motor and chainring
The chainring feels solid, probably steel.
The plastic chainring cover feels, well, plasticy. Just like every other plastic cover. What else does it need to feel like? The crank arms feel like aluminium, and reasonably light. Not as solid as my Shimano XT crank arms which I think are milled steel, these arms feel more like lower grade, but functional. I have never experienced a broken crank arm in my whole life regardless of what it was made of.
The brake levers feel good. They too are light aluminium but they also feel like quality, I don't think they screwed around half-assed when making them. I like the quality of them, the rubber covers, and also that they are full levers and not 2-finger levers.
There is a little blue button/sensor inside each lever to cut the power when braking.
Lastly, there is the new colour display. It's box has P850C written on it. I'm looking forward to seeing what this does once I have it all setup but for the moment here is just a photo
The unit is nice and large, almost the same size as my cup of tea.
It has three buttons on the button unit, a USB port (it will be interesting to see how this functions, I wonder if it also is an update port?), there is also a magnet wheel sensor to manage the motor and be used by the display for speed and other readouts.
I also got a few parts printed for the lipo battery mount. It fits to the frame really well, and holds the lipo battery perfectly. I think my dimensions and designs are getting better. First time success with only my loose planning.
So tomorrow we will be mounting all this stuff. Happy days.
So I guess the next step I have to take while I wait for the ebike motor to arrive in the post, I should probably start thinking about some type of holder for the bike batteries allowing me to mount them securely to the frame, first step would be to measure the bike down and seat tube diameter with my digital calipers. I scraped the numbers down with a pencil on some cereal box card
That's the basics. I have to remove the front gear derailleur when mounting the ebike motor as there is no point keeping it with a single chainring. Removing it will mean one thing less to worry about when designing parts, it saves me time from having to measure gaps and spacing in my design. I figure all I really need is a couple of frame clamps and bottle mount holes
So I figure that's all the pen doodling we need to do. Next we open up sketchup and start using our measurements to get a design idea created. When I design, I don't have a concrete plan, I allow a large amount of creation to happen as I get through stages, if by the time I get to the next design stage and feel unsatisfied then I CTRL + Z (Undo) and start that step again.
Some of the things I think about are alignment of holes, correct sizing of holes, I'm thinking about structural strength so I think about clamp thickness (but also not going too far as to add too much time to my 3D print), I also think about whether or not I feel the printer will encounter problems with the design such as overhangs and bridges. I try to avoid those if possible just to get a print done with less hassle. Simplicity is key.
Here's some parts on my printer software (Repetier Host). There are other printer software packages to use if you want to try others. I really only use this because I have a Delta printer and it has a preset for it.
Once we're happy with design attempt #1 (be prepared for having to refine it until it's functional. If you hit the bullseye first try you can feel really happy, applaud yourself) we can then use the software to slice it up into layers and have our printer make it. My software estimates that these two parts will take approximately three hours, and 45 minutes respectively. My printer time estimation is sometimes out by up to 20 minutes so don't think about it too accurately. I'm going to print in PETG which is popular for tough engineering parts, PLA is okay too but will crack and snap at it's tensile limits. PETG seems to not snap, but bend/warp when near its limits. So now I have some printing and mount testing to do. Please come back in a few days to see how I get on with that. Thanks.
So, I decided to build an ebike. While I wait for other parts to arrive, here are my current plans. I have two Lipo batteries which I plan on wiring in series to make a 48v battery. They are Multistar 16000mah 6s Lithium Polymer packs.
These packs weigh 1.978kg each, their dimensions are: 18cm x 7.5cm x 7.3cm which is about the same volume as a bike drink bottle.
Interestingly, when you buy such large quantities of lithium packs here in the UK, the packaging comes with it's own materials identifier label, you also get a phone call from customer services to ask you about your delivery which is interesting. I have never had that before. Always have a cup of tea close by
I plan to mount these two lipo packs to a bike frame, close to the drinks bottle mount positions. I have some super-strong PETG filament to print and design some kind of mount clamp support thing, i'm sure it will be suitable
I chose to use these packs over Li-ion packs for a number of reasons. The price is low as they are currently on offer, I already have fast charging for these packs (I have Turnigy Reaktor 300w charging), I have trust in the specification of these packs - I am still unsure about buying 18650 cells from the internet and trusting their reliability. I have cut open many 18650 cells in the past and have noticed so many counterfeit cells - they are usually containing much smaller lithium cells inside and filled with a white powder to fill the tubing. Here's a video showing the white powder inside, some more links herehere and here. I must note that I have some good 18650 cells from Panasonic, they are 3400mah panasonic ncr18650b cells which I use in my torches, they are wonderful, the real-deal but costly. Once you experience fake 18650 cells you are hurt. Why do they do this? It looks like a lot of work to make those fake cells, I wonder who's doing it? I also like the capacity to price of these packs. 16ah capacity. The most common Li-ion packs appear to be around 8-11ah and their cost is ranging from £200-£600 (or £400-£1000 after all this post Brexit shit completes its so called meltdown :) lol fear!!! Be afraid!!! hahaha I know that the Li-ion cells have a greater number of charge cycles (over 2000+ supposedly), the Lipo packs are rated at 500 charge cycles. In real-world, this is more subjective based on full-charge or part-charging, discharge rates etc. For the price, I am happy to use lipo. I am not interested in spot-welding my own 18650 Li-ion pack or making a BMS wiring system for them, I like the simplicity of these 6s packs to use with my charging station I also have some nice XT90 connectors to link the packs
The size as you can see is quite larger than XT60 connectors. I also have 10AWG wire to solder the harness adapter.
The bike I am using for this experiment, I pulled from a skip. It is a Carrera mountain bike which I will modify, the frame is good, the wheels are fine. So the bike was free. Free is good.
So while I wait for the motor to arrive here are some more photos of the lipo packs. I will update more on the build soon, it should be a fast build.
Hi, I have been asked (regularly) where I have been and what I am up to. I am still here, just enjoying the sunshine and garden while it lasts, I have to move away from code work from time-to-time, otherwise I face burnout and lose desire to figure things out. I am sure once the storms begin I will be back behind a desk working on projects again. I have a couple of things I have been doing DIY-style so I hope to do a write-up soon. Here are a couple of things I have been making: DIY Guitar amp I decided I wanted a guitar amplifier for my electro-acoustic guitar (A takamine I have had for 15 years), I could not afford to buy such acoustic amps like the Roland AC-33 or the AER ALpha, however I thought I could probably make my own equivalent using cheap parts. The Roland and AER seem to be very popular 'busking' amps right now, but the price is crazy. The amp I wanted had to be battery powered (easy to do), lightweight, and above all sounding good. I found some old Bose speakers which I really liked the sound of, I already knew about the quality they produce. I think I got them for $10 with a bass box included. I wired using a 12v Ubec & 3s lipo battery
(pre-drilled)
Then it was just an issue of having to cut holes in my box, handle, input jack, small amount of soldering for the audio connections to the jack, and I used an old Jute shopping/grocery bag for speaker grille cloth (I looked up Gibson and Fender grille cloth and my god! it is like $40 for a small 30cm square)
I am very happy with the sound. There is no distortion at volume, and the clarity is excellent. The battery lasts forever, well beyond the time it takes for my fingers to really feel the strings. Now, I just have to find a quiet place to practice.
Digital FPV System
One of the things that I have been really hoping to see developed by some in the DIY community has been HD digital fpv. For many years most RC pilots have used analogue/composite video systems which are limited in resolution. However, since DJI released Lightbridge things are slowly starting to change, and other digital systems are starting to appear. The price is astronomical, however. And I am unwilling to buy a $1500 dollar product just for video.
As I have not been completely satisfied with the DIY projects that deal with digital fpv, I figured I might aswell dip my toes into understanding the technology myself and see if I can jumpstart a number of developers to become involved. It's is progressing. Learning as I go along; and others help with input and comments and tests of their own. So perhaps it will workout. Who knows? Here is an overview of what's happening:
What will we end up with? Hopefully video plus telemetry on both a phone/tablet, and also FPV video goggles. I must admit this is a big project to try to undertake, and the vultures will circle and swoop at the nearest opportunity, but I am so far enjoying the learning. So far we have UDP video and telemetry from the drone using UDP which is not the most reliable protocol for fpv. UDT would be more desirable but no-one knows much about it, especially me, yet.
So, there you go. Those are the things I have been doing in between painting a house. Variety keeps the mind going.
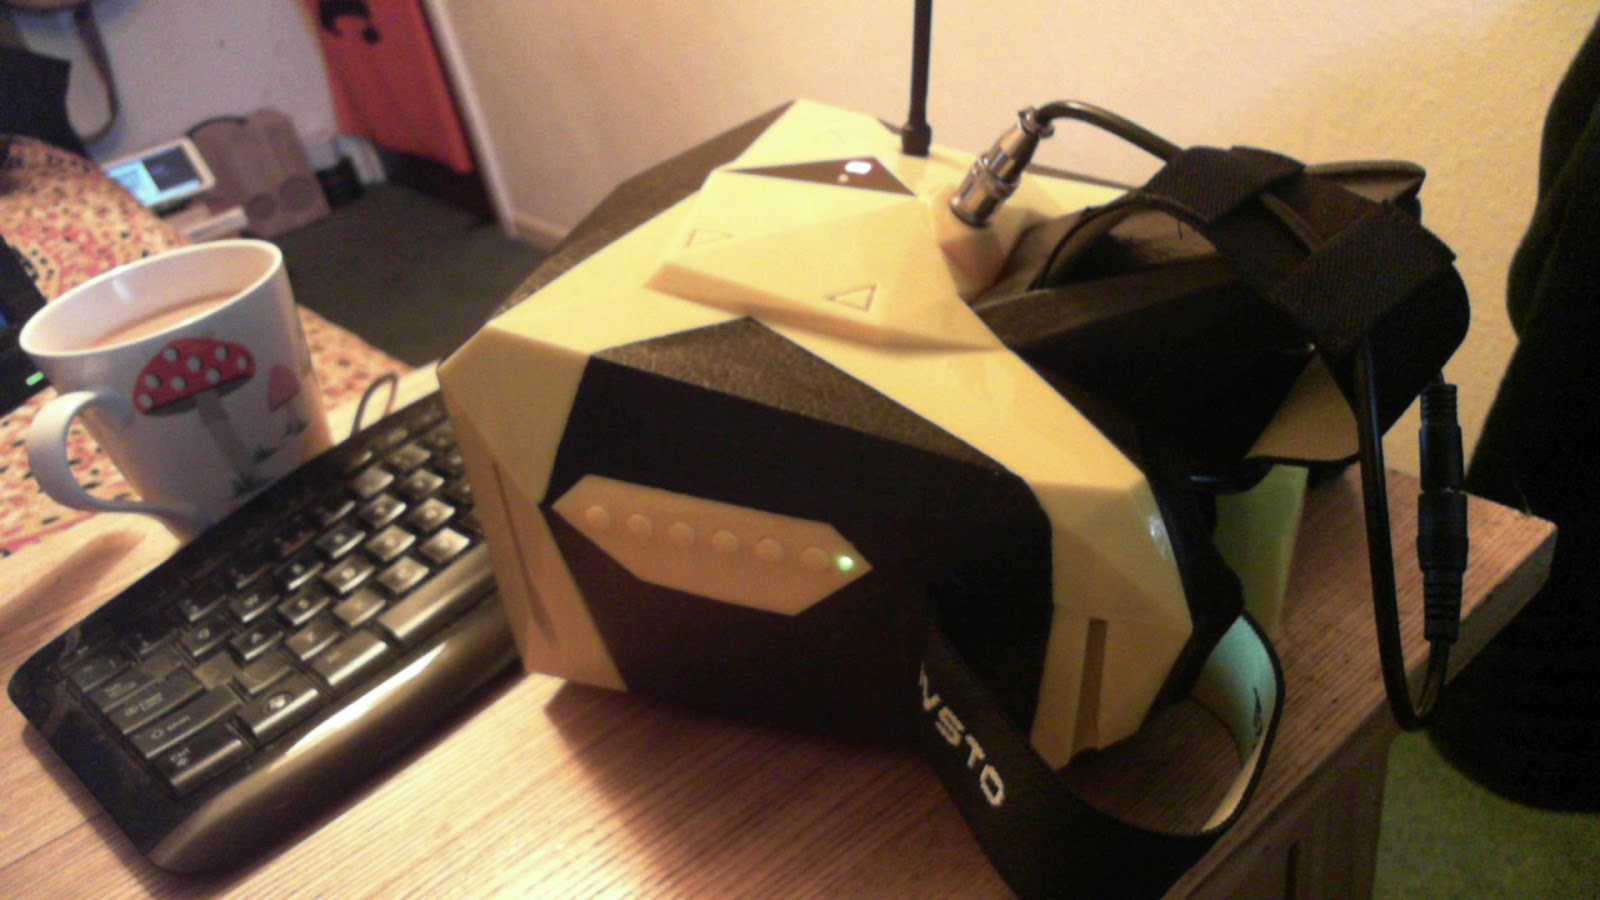
Business is improving for me, and I recently got a pair of ready-made fpv goggles and thought I would make a review and comparison to see how things have changed.
The goggles I have now, are by a company called Tovsto who were displaying products at this years CES 2016 show and appear to be quite similar to Headplay HD goggles.
I got them from Gearbest at this link after reading about the various types of goggle on the market and trying to find a good deal to suit my needs. I looked at all the usual locations and found that these were currently on discount so click... checkout.
For the last couple of years I have mostly been flying using a monitor mounted directly to my transmitter
this has proven a general success for me, as I have had zero crashes and always have been able to use the data displayed to locate and recover if I get lost in unfamiliar territory. I like that I can glance up at the sky if I need to check my orientation. orientation helps buckets, when flying via a monitor, which is why we also tend to use OSD data when flying to help us know where we are, how far/high we are, and how to get home.
(My view from the TOVSTO goggles)
What I see when i'm flying, i'm usually concentrating on the digits and arrows more than the sky or trees as once you're up high in the air there's nothing to crash into - you're completely free to roam. The rate of Altitude increase/decrease is deathly important, direction to home arrow helps when lost.
Once I had the grasp of flying using a monitor, I decided like most DIYers, to see if I can craft a set of goggles using some cardboard, a fresnel lens and a strap. It worked for the most part. It blocked out most of the sunlight and gave me a more 'closed' viewing environment. They were a bit front-heavy and would droop down my face a bit, but for practically no money, they were fun.
(DIY and Product)
So, "how do they compare to a purchased pair?"
This is a common question, and up until now I have not really been in a position to compare or answer this as appropriately as I would have liked. But now I can, and well, how do they compare?
Image would be a good beginning point. Here is a side by side:
On the left is my monitor, on the right the goggles
Here's a closer comparison of image quality
left is monitor, right is goggles
What is my subjective opinion on the image? It appears to be similar at first. This is because of the resolution limits of transmitting old-school analogue/composite video over 5.8ghz transmitters. A 5.8ghz transmitter will transmit to both monitors the same picture regardless of pixel ratio of the screens, and it will appear very similar.
The advantage of the goggles are that they block out all light, eliminating sun reflections on the monitor screen. We all know how hard it is to view our smartphone out during a sunny day, it's almost impossible to read articles. By covering or blocking out the sun using goggles we can see much more clearly, we just look a bit silly when doing so...I mean look at this guy:
we only have to search silly man with fpv goggles to see how and why we as men should not really be allowed to walk the streets after dark.
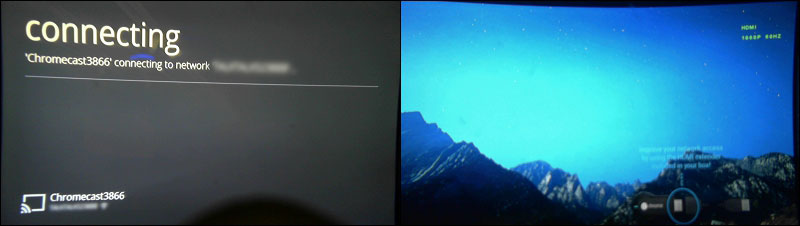
The nice thing about the Tovsto goggles are that they do actually broadcast 1080p 60hz using the HDMI port on the top. I thought what better way to test this out than to plug in my Chromecast and see if I can stream porn youtube videos through them. It appears that after a little cutting I could connect a mini-to-full hdmi adapter I have from a Raspberry pi zero, and plug in the chromecast quite easily
Once connected, I am able to see that the monitor has switched to HDMI 1080p 60Hz mode
(See, it says so in green in the corner)
The chromecast boots up
The picture is lovely, to choose a word. It is bright, crisp, clear, pleasant to view, and there is hardly any pixelation. God bless HDMI. This 1080p would work well with DJI Lightbridge or Connex HD systems, or even my up-and-coming DIY digital HD system!
Here is a piece of footage to show the video chromecast shenanigans
Works for me fappityfapfapfap...
Anyway, so how do the goggles perform as FPV goggles? Well, here is some more video footage showing as best I can, obviously, I can't fly around with a camera stuck inside there it would be tomfoolery. But here is my best test so far
For flight footage I need to think about how I can get footage. I have a DVR I could hook up but the DVR only records 640x320 pixels. I might try flying with the monitor and have someone hold a camera inside the goggles for me, bear with me one that footage, I'll plan it and make some magic happen.
So what do I like about these goggs?
- I like the image quality over HDMI
- I like the lightweight setup
- I like the quality of the mushroom antenna, it bends nicely
- I like neat storage bag that comes with them, it will help me to keep them clean and free from dust and scratches
- I like that the channel selecting is automatic. The goggles auto search when powered on, you also have a small press button which will search for signal
- I also like that these goggles have an inbuilt speaker which produces static when the receiver video fades out to static (they avoid blue screening). This is a nice audible warning for me, I do wish fpv systems incorporated audio more as I think hearing your quad or plane helps you know how the motors are responding and this helps you fly more accurately on the whole. I have a 5.8ghz transmitter with audio so perhaps I will test this out on these goggles.
What do I think could be improved upon? after all, nothing is perfection right? Well, I think the HDMI slot on the goggles could be more accommodating, it's a bit small. It is a mini hdmi port, but to fit an adapter in there you have to snip some of the foam. It's a simple solution and doesn't cause damage. I would also like to see a headphone jack. I'm sure this is an easy DIY addition, but I would have liked to see it installed already.
Also, I would like to see the goggles have an included adapter to allow a user to connect a standard 2s lipo, and lipo alarm. The included battery is an enclosed unit that simply warms the user, then shuts off the monitor - I have no idea what the voltage of this battery was/is when it shutdown. the charger is a 8.4v 1 amp wall adapter with charge on/off light.
If I am attaching a lipo battery to the back of my head I want to know that it is safe, and charged correctly or I might end up Tyler Durden 'end scene':
But I hope not.
I do think the TOVSTO goggles are an improvement for me and my own setup, I also think they are better value than headplay, better quality than quanum, and the single screen is better for my eyes than side-by-side cardboard goggles. I don't think single screen fpv goggles are going to compete with sbs goggles yet, the plain, simple view is beneficial to pilots and their ability to control aircraft.


